[Optional] Configure CTA
This chapter describes how to do a tailor-made CTA configuration. It could be useful when it is required to test a particular CTA subsystem. In the general case the default settings should be sufficient.
Configure the ObjectStore
There are two types of ObjectStore: Virtual File System (VFS) or Ceph distributed storage system.
Configuration for a test system
In a test system, configure the ObjectStore as a VFS. Initialise the new
ObjectStore VFS and set global rwx permissions:
export OBJECTSTORETYPE=file
export OBJECTSTOREURL=$(cta-objectstore-initialize | awk '/New object store path/{print $NF}')
chmod -R 0777 ${OBJECTSTOREURL##file://}
$ ls -ld ${OBJECTSTOREURL##file://}
drwxrwxrwx. 2 root root 240 May  9 11:22 /tmp/jobStoreVFSg4Mqz4/
Add it as a configuration parameter in /etc/cta/cta-taped.conf and /etc/cta/cta-frontend.conf
ObjectStore BackendPath /tmp/jobStoreVFSOKJCjW
and /etc/cta/cta-frontend-xrootd.conf
cta.objectstore.backendpath /tmp/jobStoreVFSOKJCjW
Configuration for a production system
In a production system, configure the ObjectStore to use Ceph. To install Ceph:
yum-config-manager --enable ceph
yum -y install ceph-common
The Ceph client version must match the version of the Ceph server you are connecting to. If there are problems connecting, check the required version number with the Ceph server administrator. At the time of writing, the required version is:
$ ceph --version
ceph version v11.0.0-2590-g08becd3 (08becd34a82b2c541f0aeeaf28c4038faf268d47)
Specify the location of the Ceph cluster monitor daemon in
/etc/ceph/ceph.conf. To use the CERN Ceph cluster monitor:
[global]
   mon host = cephmond.cern.ch:6790
Configure the following environment variables to specify the
ObjectStore. For convenience, save these in a file (e.g.
/etc/sysconfig/ceph.conf) which can be sourced from the shell:
# Initialise ObjectStore configuration with:
#
# . /etc/sysconfig/ceph.conf
#
# Declare which type of ObjectStore you have. Possible values: file or ceph
export OBJECTSTORETYPE=ceph

# Define the ObjectStore ID, which corresponds to the Ceph user name. The Ceph
# service manager should provide this value.
export OBJECTSTOREID=eoscta

# Define the ObjectStore pool name on Ceph. The Ceph service manager should
# provide this value.
export OBJECTSTOREPOOL=eoscta_metadata

# Define the ObjectStore namespace name which will be prepended to all objects
# in the ObjectStore. The CTA service manager defines this value. Usually it is
# kept as "cta-ns".
export OBJECTSTORENAMESPACE=cta-ns

# This is just to construct the URL from the above values
export OBJECTSTOREURL=rados://${OBJECTSTOREID}@${OBJECTSTOREPOOL}:${OBJECTSTORENAMESPACE}
Create the Ceph keyring for this CTA instance
(/etc/ceph/ceph.client.$OBJECTSTOREID.keyring). Fill in the values
which correspond to the environment variables defined above:
[client.OBJECTSTOREID]
   key = CEPH_OBJECTSTORE_SECRET_KEY
   caps mon = "allow r"
   caps osd = "allow rwx pool=OBJECTSTOREPOOL namespace=OBJECTSTORENAMESPACE"
There is also a configuration file /etc/ceph/rbdmap but this appears
to contain only comments:
# RbdDevice        Parameters
#poolname/imagename    id=client,keyring=/etc/ceph/ceph.client.keyring
Initialise the ObjectStore:
cta-objectstore-initialize $OBJECTSTOREURL
To list the ObjectStore content:
$ rados -p $OBJECTSTOREPOOL --id $OBJECTSTOREID --namespace $OBJECTSTORENAMESPACE ls
cta-objectstore-initialize-p06253947b39467.cern.ch-192840-20170512-12:56:25 root
driveRegister-cta-objectstore-initialize-p06253947b39467.cern.ch-192840-20170512-12:5
agentRegister-cta-objectstore-initialize-p06253947b39467.cern.ch-192840-20170512-12:5
schedulerGlobalLock-cta-objectstore-initialize-p06253947b39467.cern.ch-192840-2017051
To delete the ObjectStore content:
rados -p $OBJECTSTOREPOOL --id $OBJECTSTOREID --namespace $OBJECTSTORENAMESPACE \
    ls | xargs -itoto rados -p $OBJECTSTOREPOOL --id $OBJECTSTOREID --namespace \
    $OBJECTSTORENAMESPACE rm toto
Configure the Catalogue
The Catalogue is stored in an Oracle database. The database connection
string is specified in /etc/cta/cta-catalogue.conf in the format
oracle:username/password@database.
There are various reasons why SQLlite is not suitable for system tests: Resource starvation; SQLite and Oracle handle locking differently; and test coverage (we need to use Oracle part of the system that will be used in production).
/etc/cta/cta-catalogue.conf should contain exactly one connection
string. For example, to configure CTA to use database devdb12 with
login name cta_test and password MYSECRET:
oracle:cta_test/MYSECRET@devdb12
To use this configuration to create a new database schema:
cta-catalogue-schema-create /etc/cta/cta-catalogue.conf
To test the correctness of the newly created database schema:
cta-catalogue-schema-verify /etc/cta/cta-catalogue.conf
To drop an existing database schema:
$ cta-catalogue-schema-drop /etc/cta/cta-catalogue.conf
WARNING
You are about to drop the schema of the CTA calalogue database
    Database name: devdb12
Are you sure you want to continue?
Please type either "yes" or "no" > yes
DROPPING the schema of the CTA calalogue database
Dropped table CTA_CATALOGUE
Dropped table ARCHIVE_ROUTE
Dropped table TAPE_FILE
Dropped table ARCHIVE_FILE
Dropped table TAPE
Dropped table REQUESTER_MOUNT_RULE
Dropped table REQUESTER_GROUP_MOUNT_RULE
Dropped table ADMIN_USER
Dropped table ADMIN_HOST
Dropped table STORAGE_CLASS
Dropped table TAPE_POOL
Dropped table LOGICAL_LIBRARY
Dropped table MOUNT_POLICY
Dropped sequence ARCHIVE_FILE_ID_SEQ
Configuration for a test system
A postgres instance running in a container is a quick way to test with a local db.
docker volume create pgdata

docker run --network bridge --rm -v pgdata:/var/lib/postgresql/data --name pg-cta -e POSTGRES_PASSWORD=password -d -p 5432:5432 postgres:9.6

echo "postgresql:postgresql://postgres:password@172.17.0.2:5432/postgres" > /etc/cta/cta-postgres.conf
Configure CTA Frontend
Create the CTA Frontend configuration file /etc/cta/cta-frontend.conf.
The ObjectStore Backend should point to the $OBJECTSTOREURL specified
in Section Configure the objectstore:
ObjectStore BackendPath rados://cta-id@cta-tapepool:cta-ns
Catalogue NumberOfConnections 1
Log URL file:/var/log/cta/cta-frontend.log
Create the corresponding logfile:
touch /var/log/cta/cta-frontend.log
chmod a+w /var/log/cta/cta-frontend.log
Create the CTA user:
useradd cta
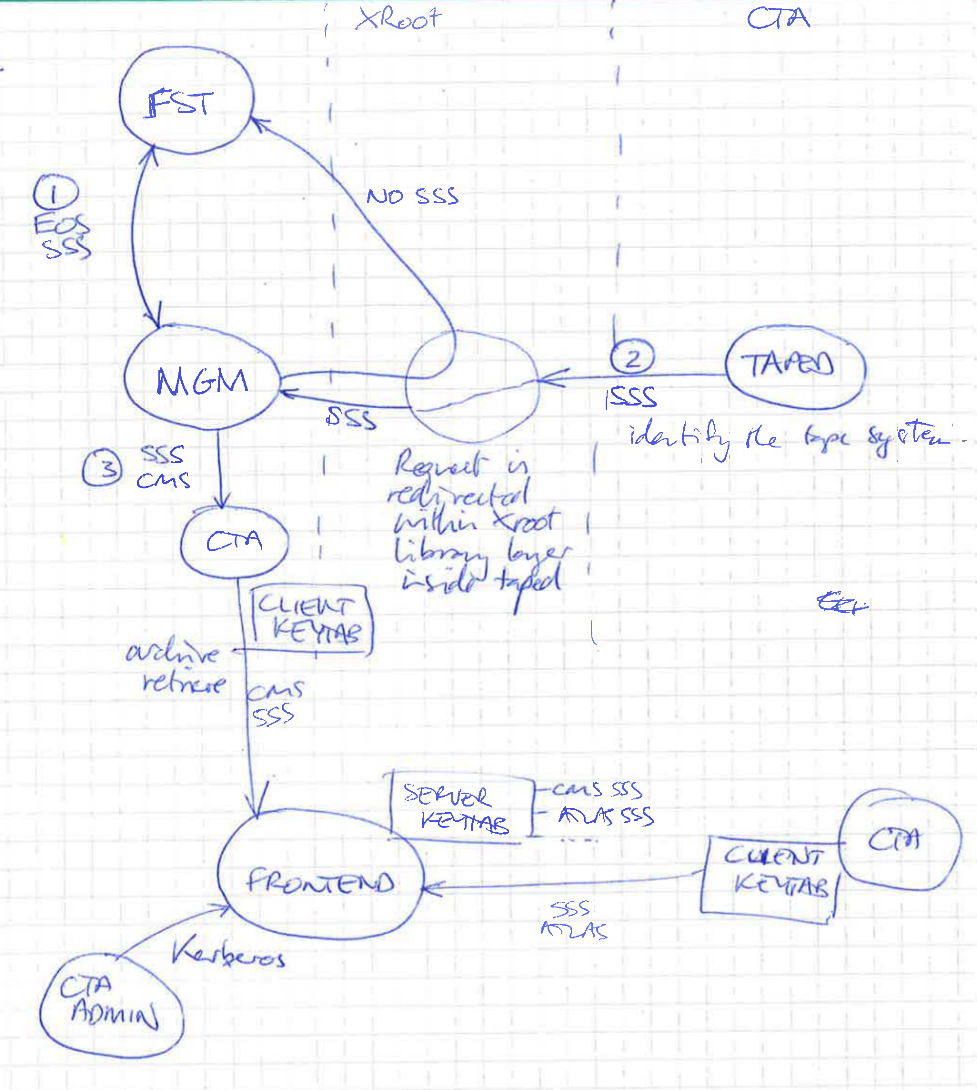
The CTA Frontend requires both Kerberos and SSS authentication: Kerberos
is used to authenticate user archive/retrieve commands and admin
commands. SSS is used to authenticate communication between the Frontend
and CTA/EOS mgm. See Figure Authentication Mechanisms in CTA for an
overview.
CTA Frontend Kerberos Authentication
CTA uses one of the Kerberos keys from /etc/krb5.keytab. If this file
does not exist, see Appendix Create a Kerberos keytab file
for details of how to create it. This file should be copied to the CTA
Frontend keytab which should be owned by the user/group which will run
the CTA Frontend XRoot daemon:
cd /etc
cp krb5.keytab /etc/cta/cta-frontend.krb5.keytab
chown cta:tape /etc/cta/cta-frontend.krb5.keytab
Check the contents of the new keytab:
echo -e "read_kt krb5.keytab.cta\nlist\nquit" | ktutil
CTA Frontend SSS Authentication
There will be one EOS instance per User (Atlas, CMS, etc.), each of which can send archive and retrieve requests to the CTA Frontend. Each EOS instance should have its own Simple Shared Secret (SSS) key[^1].
The EOS instance name is used as the user name for the SSS key. In the
case of a local EOS instance (See Appendix [install_eos]), this can
be found in the eos_env configuration file:
$ grep EOS_INSTANCE_NAME /etc/sysconfig/eos_env
EOS_INSTANCE_NAME=eosdev
$ cd /etc
$  xrdsssadmin -k cta_eosdev -u eosdev -g cta add ctafrontend_server_sss.keytab
xrdsssadmin: Keyfile 'ctafrontend_server_sss.keytab' does not exist. Create it? (y | n): y
xrdsssadmin: 1 key out of 1 kept (0 expired).
$ cp ctafrontend_server_sss.keytab /etc/cta/eos.sss.keytab
$ chown cta /etc/cta/eos.sss.keytab
$ chmod 600 /etc/cta/eos.sss.keytab
The -k option specifies the key name that the -u (user) and -g
(group) options will be applied to, overriding the default
nobody/nogroup.
If the keyname ends with +, SSS tokens may be forwarded when encrypted
by the associated key, i.e. the key can be used by a different host from
the one that encrypted the SSS token. This is required in certain
situations, for example when tunnelling through a NAT device or when
creating keys for use in the Kubernetes environment.
In production, the + should be omitted, as forwardable keys are
inherently less secure. Allowing forwarded tokens makes it impossible to
detect man-in-the-middle attacks or stolen SSS tokens.
The SSS key that we have just created also needs to be available to the EOS client, so we copy the server keytab into the client keytab:
cp ctafrontend_server_sss.keytab ctafrontend_client_sss.keytab
chmod 600 ctafrontend_client_sss.keytab
chown cta ctafrontend_client_sss.keytab
As mentioned above, in principle there should be one key per EOS
instance, so ctafrontend_client_sss.keytab may contain more than one
key. However, as the XRoot client only uses the last key added the
keytab, the entire keytab can be safely copied to the client (so long as
the key for that instance is the last one that was added).
CTA Frontend XRoot Configuration
The EOS XRootD daemons (fst, mgm, mq) have their configuration
files under /etc/xrd.cf.<daemon>. The CTA XRootD configuration files
are in a different directory, under /etc/cta/<daemon>-xrootd.conf.
Edit /etc/cta/cta-frontend-xrootd.conf and ensure that both Kerberos
and SSS are enabled and using the correct keys. This is specified using
the sec.protocol and sec.protbind configuration lines.
[loglevels] Set the desired log level using cta.log. Available log
levels are:
none,error,warning,info,debug,all
There are also two bitmasks:
-
protobufshows the contents of Protocol buffers in JSON format -
protorawshows the serialized Protocol buffer, i.e. what is sent on the wire
Log level all is the same as debug protobuf protoraw.
The file should finish looking something like this:
# Set the CTA XRootD SSI Protobuf log level
cta.log info

# Load the CTA SSI plugin
xrootd.fslib libXrdSsi.so

# Load the SSI module
ssi.svclib libXrdSsiCta.so

# Use the security module
xrootd.seclib libXrdSec.so

# Protocol specification
# The xroot server process needs to be able to read the keytab file
sec.protocol krb5 /etc/cta/cta-frontend.krb5.keytab cta/devbox.cern.ch@CERN.CH
sec.protocol sss -s /etc/cta/eos.sss.keytab

# Only Kerberos 5 and sss are allowed
sec.protbind * only sss krb5

# Turn off asynchronous i/o
xrootd.async off

# Use a port other than 1094, already used by EOS xroot server
xrd.port 10955

# Export the SSI resource
all.export /ctafrontend nolock r/w
In sec.protocol krb5, specify the file with the kerberos key generated
before and the principal name to be used.
Configure the CTA Command Line Interface (CLI) to talk to the same host:port as specified above:
# The CTA frontend address in the form <FQDN>:<TCPPort>
<host>.cern.ch:10956
Create a CTA Admin User
In order to use the cta admin command (see
Section [admin_commands_cta_admin]), the admin user must already be
defined. The cta-catalogue-admin-user-create command is provided to
avoid the circular problem of not being able to use cta admin to
create the admin user, by connecting directly to the catalogue database.
cta-catalogue-admin-user-create /etc/cta/cta-catalogue.conf -u admin1 -m "Administrative User"
admin1 has to be your kerberos username.
Start CTA-Frontend
To start using the cta-frontend, it has to be initialized.
systemctl start cta-frontend
First launch kinit to get the kerberos authoritation.
kinit admin1
cta-admin version
If there is any problem with the kerberos authentication is posible to see the debug trace executing the command with this external variable:
XrdSecDEBUG=1 cta-admin version
Install the Tape Server
Install the Tape Library
If the CTA instance is not using real tape hardware, follow the directions in Appendix Install mhvtl to install the mhVTL Virtual Tape Library.
Install the Remote Media Changer Daemon (cta-rmcd)
The Remote Media Changer Daemon (cta-rmcd) is a TCP/IP server which
controls the robots in the tape libraries. cta-rmcd must run locally
for security reasons: it only listens to the localhost network. It
includes a device driver for the drive and one for the library.
Install cta-rmcd:
yum install -y castor-rmc-client castor-rmc-server initscripts
initscripts will be removed when cta-rmcd is
ported from init.d to systemd.
The configuration file /etc/sysconfig/cta-rmcd should contain the
following settings:
DAEMON_COREFILE_LIMIT=unlimited
RUN_RMCD=yes
CTA_RMCD_OPTIONS=/dev/smc
Start cta-rmcd:
systemctl start cta-rmcd
smc can be used to load/unload tapes (instead of mtx).
Configure the CTA Tape Server Daemon
Create /etc/cta/cta.conf and configure the number of buffers and the
ObjectStore URL. The following example configures 10 buffers of 5 Mb.
(The buffer size in this case is the compile-time default, see values
below). Replace OBJECTSTOREURL with the value defined in
Section Configure objectstore:
taped BufferCount 10
ObjectStore BackendPath OBJECTSTOREURL
Define the tape drives in /etc/cta/TPCONFIG. The four columns are Tape
Drive, Logical Library, No-rewind SCSI Device, SCSI Media Changer
Device:
VDSTK1 VLSTK /dev/nst0 smc0
VDSTK2 VLSTK /dev/nst1 smc1
Now start the Tape Server. cta-taped is an XRootD client, linked with
libXrdCl.so. This library needs to be told which authentication method
to use: set XrdSecPROTOCOL to use sss authentication (to talk to the
mgm) and also unix authentication (to talk to the fst). Also
specify the location of the keytab in XrdSecSSSKT:
# XrdSecPROTOCOL=sss,unix XrdSecSSSKT=/etc/cta-taped.keytab cta-taped
# cta-admin drive ls
  smc0  devbox.cern.ch  VDSTK1  Down  NoMount      0  1495195920  0  0  0.000000
  smc1  devbox.cern.ch  VDSTK2  Down  NoMount      0  1495195920  0  0  0.000000
Log messages are sent to rsyslog. When cta-taped starts, it reports
its configuration. This is set from compile-time defaults, overwritten
by any values set in /etc/cta/cta.conf (see above):
$ grep cta-taped /var/log/messages
TID="430" MSG="cta-taped started" version="0-0" foreground="0" logToStdout="0" logToFile="0" logFilePath="" configFileLocation="/etc/cta/cta.conf" helpRequested="0"
TID="430" MSG="Configuration entry" category="taped" key="LogMask" value="DEBUG" source="Compile time default"
TID="430" MSG="Configuration entry" category="taped" key="TpConfigPath" value="/etc/cta/TPCONFIG" source="Compile time default"
TID="430" MSG="Configuration entry" category="taped" key="BufferSize" value="5248000" source="Compile time default"
TID="430" MSG="Configuration entry" category="taped" key="BufferCount" value="10" source="/etc/cta/cta.conf:1"
TID="430" MSG="Configuration entry" category="taped" key="ArchiveFetchBytesFiles" maxBytes="80000000000" maxFiles="500" source="Compile time default"
TID="430" MSG="Configuration entry" category="taped" key="ArchiveFlushBytesFiles" maxBytes="32000000000" maxFiles="200" source="Compile time default"
TID="430" MSG="Configuration entry" category="taped" key="RetrieveFetchBytesFiles" maxBytes="80000000000" maxFiles="500" source="Compile time default"
TID="430" MSG="Configuration entry" category="taped" key="NbDiskThreads" value="10" source="Compile time default"
TID="430" MSG="Configuration entry" category="taped" key="WatchdogIdleSessionTimer" value="10" source="Compile time default"
TID="430" MSG="Configuration entry" category="taped" key="WatchdogMountMaxSecs" value="900" source="Compile time default"
TID="430" MSG="Configuration entry" category="taped" key="WatchdogNoBlockMoveMaxSecs" value="1800" source="Compile time default"
TID="430" MSG="Configuration entry" category="taped" key="WatchdogScheduleMaxSecs" value="60" source="Compile time default"
TID="430" MSG="Configuration entry" category="general" key="ObjectStoreURL" value="/tmp/jobStoreVFSAgmdey" source="/etc/cta/cta.conf:2"
TID="430" MSG="Configuration entry" category="general" key="FileCatalogConfigFile" value="/etc/cta/cta-catalogue.conf" source="Compile time default"
TID="430" MSG="Configuration entry" category="TPCONFIG Entry" unitName="VDSTK1" logicalLibrary="VLSTK" devFilename="/dev/nst0" librarySlot="smc0" source="/etc/cta/TPCONFIG:1"
TID="430" MSG="Configuration entry" category="TPCONFIG Entry" unitName="VDSTK2" logicalLibrary="VLSTK" devFilename="/dev/nst1" librarySlot="smc1" source="/etc/cta/TPCONFIG:2"
TID="430" MSG="Set log mask" logMask="DEBUG"
TID="430" MSG="Set process capabilities" capabilities="= cap_setgid,cap_setuid+ep cap_sys_rawio+p"
TID="431" MSG="Got dumpable attribute of process" dumpable="true"
TID="431" MSG="Set process capabilities" capabilities="= cap_sys_rawio+p"
TID="431" MSG="Adding handler for subprocess" SubprocessName="signalHandler"
TID="431" MSG="Adding handler for subprocess" SubprocessName="drive:VDSTK1"
TID="431" MSG="Adding handler for subprocess" SubprocessName="drive:VDSTK2"
TID="431" MSG="Adding handler for subprocess" SubprocessName="garbageCollector"
TID="431" MSG="Subprocess handler requested forking" SubprocessName="drive:VDSTK1"
TID="431" MSG="Subprocess handler will fork" SubprocessName="drive:VDSTK1"
TID="431" MSG="Subprocess handler requested forking" SubprocessName="drive:VDSTK2"
TID="432" MSG="In child process. Running child." SubprocessName="drive:VDSTK1"
TID="431" MSG="Subprocess handler will fork" SubprocessName="drive:VDSTK2"
TID="431" MSG="Subprocess handler requested forking" SubprocessName="garbageCollector"
Configure the cta-taped sudo user
The username specified in the SSS key shared between the EOS MGM and CTA Tape Server must be configured as an EOS superuser:
$ sudo eos vid set membership cta +sudo
success: set vid [  eos.rgid=0 eos.ruid=0 mgm.cmd=vid mgm.subcmd=set mgm.vid.cmd=membership mgm.vid.key=cta:root mgm.vid.source.uid=cta mgm.vid.target.sudo=true ]
Start the XRoot daemon, specifying the name of the XRoot instance
(-n), the name of the configuration file we just created (-c), use
IPv4 protocol (-I v4), run in the background (-b) and where to put
the log file (-l)[^2]:
su - cta
[~]$ xrootd -n cta -c /etc/cta/cta-frontend-xrootd.conf -I v4 -b -l /tmp/ctafrontend.log
Configure EOS Workflows
The workflows define how EOS will talk to the CTA Frontend. The following EOS workflows should be registered:
-
Archive workflow (executed on CREATE and CLOSEW events)
-
Retrieve workflow (executed on PREPARE events)
-
Delete workflow (executed on DELETE events)
Create a workflow namespace directory. This will be used to store the workflow attributes but will not store any files:
eos mkdir -p /eos/dev/proc/cta/workflow
eos attr link /eos/dev/proc/cta/workflow /eos/users/test
The workflows are in a state of flux. Document this once they have settled down.
eos attr set sys.workflow.sync::abort_prepare.default="proto" /eos/dev/proc/cta/workflow
eos attr set sys.workflow.sync::archive_failed.default="proto" /eos/dev/proc/cta/workflow
eos attr set sys.workflow.sync::archived.default="proto" /eos/dev/proc/cta/workflow
eos attr set sys.workflow.sync::closew.default="proto" /eos/dev/proc/cta/workflow
eos attr set sys.workflow.sync::closew.retrieve_written="proto" /eos/dev/proc/cta/workflow
eos attr set sys.workflow.sync::create.default="proto" /eos/dev/proc/cta/workflow
eos attr set sys.workflow.sync::delete.default="proto" /eos/dev/proc/cta/workflow
eos attr set sys.workflow.sync::evict_prepare.default="proto" /eos/dev/proc/cta/workflow
eos attr set sys.workflow.sync::prepare.default="proto" /eos/dev/proc/cta/workflow
eos attr set sys.workflow.sync::retrieve_failed.default="proto" /eos/dev/proc/cta/workflow
The linked attributes on the target directory can be shown:
eos attr ls /eos/users/test
The target directory has to be configured in this way:
# Force checksums
eos attr set sys.forced.checksum="adler" /eos/users/test
# Set storage class for archival
eos attr set sys.archive.storage_class="single" /eos/users/test
# Set ACLs
eos attr set sys.acl="u:<your user ID>:rwx+dp,u:99:rwx+dp,z:!u,u:0:+u" /eos/users/test
Ensure that the EOS workflow engine is switched on:
eos space config default space.wfe=on
eos space status default
eos file workflow <filename> default create
eos file workflow <filename> default closew
eos file workflow <filename> default prepare
eos file workflow <filename> default delete
Removing CTA
To remove the CTA Front-end and associated packages:
yum remove oracle-instantclient12.1-basic oracle-instantclient-tnsnames.ora \
    oracle-instantclient12.1-devel oracle-instantclient12.1-meta cta-lib \
    cta-frontend protobuf3 protobuf3-compiler cryptopp libcephfs1 ceph-common \
    python-cephfs